4.1. Setup JetPack Flashing Environment
4.1.1. Manual Method
Note
Due to certain architectural changes in the JetPack 6.0 GA release, D3 Embedded has moved away from using NVIDIA’s SDK Manager for flashing its hardware. SDK Manager can still be used for installing additional JetPack components like DeepStream and CUDA after flashing your hardware.
NVIDIA’s default flash configurations cause GPIO conflicts with
D3 Embedded’s device tree overlays. JetPack can be installed as described by
NVIDIA’s Quick Start Guide,
but be sure to copy all files from bin/flash-config/ to your freshly set-up L4T directory.
Alternatively, D3 Embedded provides a convenience script to automate the process.
On a modern Ubuntu computer (D3 Embedded recommends Ubuntu 22.04 at this time):
Warning
The Jetson flash utilities do NOT currently support Ubuntu 24.04. Attempting to flash with an Ubuntu 24.04 host computer will fail spectacularly.
Download and extract the release archive if you haven’t already.
Locate the
flash-config/folder within the extractedbin/folder.Copy
flash-config/to the location where you would like your JetPack flashing environment to live. The folder will grow to around 30GB after flashing.Inside the newly relocated
flash-config/, open a terminal.Run
./d3-setup.shThis may take a while, as it has to download and extract NVIDIA’s JetPack SDK and rootfs. Pay close attention to any prompts, as this script will install JetPack to your working directory!After the script completes successfully, you’re ready to flash your hardware. Refer to your hardware’s “Getting Started” section for instructions on flashing it.
4.1.2. SDK Manager Method
NVIDIA’s SDK Manager can be used to partially setup your JetPack flashing
environment. SDK Manager will perform what d3-setup.sh performs, but you
will have to manually install D3 Embedded’s flash config over top of the environment
created by SDK Manager. SDK Manager itself cannot be used for flashing D3 Embedded hardware.
SDK Manager must run from a native Ubuntu 22.04 or 20.04 host computer. Virtual machines are not currently supported by NVIDIA. Additional documentation for SDK Manager is available in the SDK Manager User Guide.
Warning
SDK Manager does NOT currently support Ubuntu 24.04. Attempting to flash with an Ubuntu 24.04 host computer will fail spectacularly.
Download and install SDK Manager
Open SDK Manager and sign in with your NVIDIA Developer account
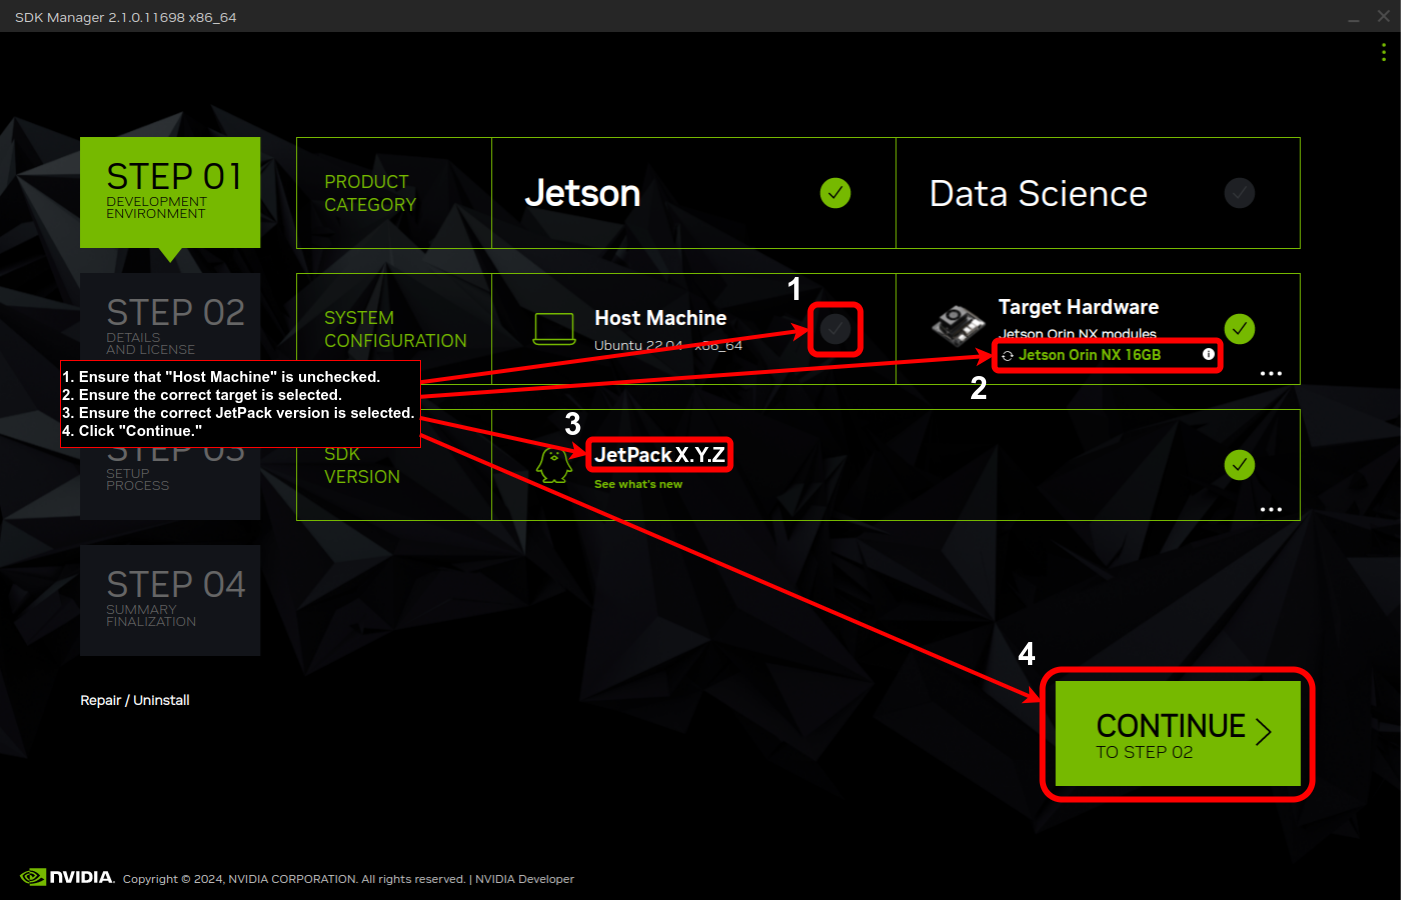
In SDK Manager Step 1, select the Jetson module attached to your hardware. Ensure that “Host Machine” is unchecked and that JetPack 6.2.1 is selected. Refer to the screenshot below. When ready, click “Continue” to move on.
In SDK Manager Step 2, only “Jetson Linux” is required. The runtime components and SDK components are not necessary and should be unselected at this step. After flashing D3 Embedded hardware, you can run SDK Manager again to install these components. After reading and accepting the license agreements, click “Continue” to create the JetPack flashing environment.

In SDK Manager Step 3, the installation process will begin which creates the JetPack flashing environment and generates the rootfs image. Eventually, SDK Manager will prompt you to flash the Jetson. Click “Skip” as flashing D3 Embedded hardware with SDK Manager will result in a non-functional flash. If you do accidentally flash D3 Embedded hardware using SDK Manager in this step, continue with the next steps. Re-flashing with the proper method documented in your hardware’s “Getting Started” section will resolve the issue.
Once the Step 4 screen is reached, you are finished with installing/flashing JetPack.
Separately, download and extract D3 Embedded’s release archive if you haven’t already.
Locate your newly installed JetPack flashing environment. This typically lives at
/home/[your username]/nvidia/nvidia_sdk/JetPack_[the version you installed]_Linux_JETSON_AGX_ORIN_TARGETS/Linux_for_TegraCopy the files in the
bin/flash-config/folder from the release archive to theLinux_for_Tegra/folder in your JetPack installation.Do not copy the folder into
Linux_for_Tegra, just the files.d3-setup.shshould be in the same folder asflash.shand any folders likekernelorbootloadershould be merged together. Do not rund3-setup.sh, as it performs the same steps that SDK Manager already did.
After copying the flash configuration, you’re ready to flash your hardware. Refer to your hardware’s “Getting Started” section for instructions on flashing it.